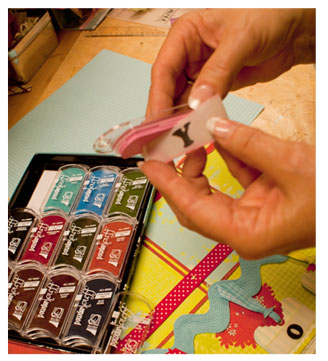
PowderPuff Chalking Ink Tips
Extend the life of your chalking ink pad and add smooth color to canvas, vellum, cardstock, chipboard and many other craft projects:
Holding the ink pad | Put your thumb in the curve and hold onto the back of the ink pad.
Use on canvas | Use very light, smooth, horizontal strokes. Continue until desired color is reached. For rich, attractive color, avoid “scrubbing” motion. Chalk edges darker and center of canvas lighter. Allow the texture of the canvas to show through. To mix color, start with lightest color and work to darker color.
Use on vellum, chipboard & cardstock | Chalk entire piece of vellum & chipboard or just edges. Try tearing edges before chalking and hold pad at angle against edge instead of perpendicular.
Use on glossy paper, transparencies & smooth surfaces
Pat the chalking ink pad on glossy surfaces; do not scrub or drag ink pad. Allow to dry.
Vellum Techniques
Add a touch of class to your pages using these vellum techniques:
Always use special adhesive | such as Helmar’s Vellum Spray or one of the following techniques to avoid visible adhesive behind vellum.
Brads and eyelets | Always cute, functional and helps dress vellum up for elegant pages and dress it down for a rustic or vintage look.
Wrap around | Cut or tear vellum a little wider than your project and wrap ends around tags, photos and flat embellishments and adhere ends on back of project. This allows you to use regular adhesive without it showing.
Glue edges| Chalk edges of vellum with PowderPuff Chalking Ink and run a regular glue stick lightly along the edges of your vellum. Glue is hidden by the chalking ink.
Use windows
Place vellum words or poems behind laser pieces and border punchouts and adhere on back.


